Alana
As mentioned in Roopa’s post about the Peanut Butter Chocolate Chunk Sandwich Cookies, this past weekend has been one of celebration, because today is my birthday! My birthday however, is not the only one that required celebrating! Friday was my mother’s birthday, so I decided to make her (but also kind of myself) a birthday cake!
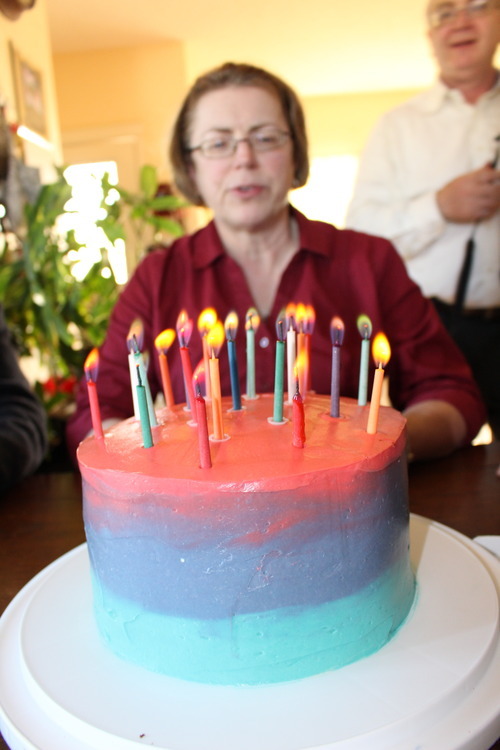
Birthday cake!
This cake recipe is definitely becoming one of my favourites. I love that it isn’t too sweet, so you really get the flavour of the chocolate and anything else you add. The batter is also on the thicker/fluffier side of things, which I find is a lot easier to work with than batters with more liquid-y textures.
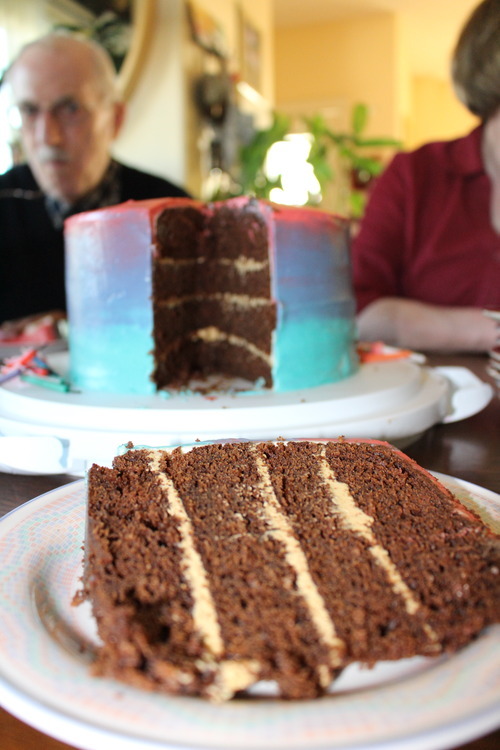
For the frosting I used Swiss meringue buttercream for the same reason that I used this particular chocolate cake recipe: it’s not as sweet, so other flavours stand out more. I decided to keep with the general theme of “chocolate”, and added white chocolate to the frosting. One thing I have noticed about adding white chocolate to this kind of frosting, is that the chocolate gives it the most amazing texture. It’s ridiculously smooth, and glorious to work with. Mostly…
Pro-Tip #3: Don’t.
To get the effect with the three colours, I used the technique explained on the Sweetapolita post Pastel Swirl Cake. In the video, she explains how you don’t want to work the icing too much so that the colours are still distinguishable. She used colours that were fairly similar, but mine were all pretty distinct so I actually tried to blend them together a little bit more.
The technique itself really isn’t hard. You basically just put different colours of icing on different parts of the cake… Yeah…
The colour scheme I ended up with wasn’t really what I was going for. I actually wanted it to be the bright pinky-red with two different shades of blue with turquoise-y tones, but when I was mixing the colours for the darker blue, it ended up having a really weird green tone to it. I tried to fix it without luck, so I decided to screw it and add a drop of electric purple, hence strange purple colour.
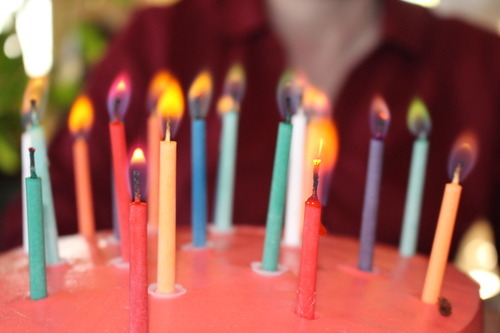
The candles matched the cake! If you look closely, you can see that the flames are actually different colours!
While I was making this cake, I was concurrently working on my London Fog Cupcakes. I decided to make my own life “easier” by making one giant batch of frosting (aka 10 cups of it), and splitting it in half.
I got both of my recipes from Sweetapolita (of course). I used her Choco Choco Birthday Cake recipe and her Swiss Meringue Butter Cream recipe, though I only used about half of the full recipe for this cake (the other half went to frosting my London Fog Cupcakes).
Peanut Butter Chocolate Birthday Cake
For the cake:
Ingredients:
- 5 ounces (145 grams) semisweet or bittersweet chocolate, chopped
- 1 cup + 1tbsp (2 ¼ sticks) unsalted butter, softened
- 2 ¾ cups cake flour
- ¼ cup (24 grams) unsweetened cocoa powder
- 2 tsp (12 grams) baking soda
- 1 tsp (5 grams) baking powder
- ½ tsp (4 grams) salt
- 4 large eggs, at room temperature 30 minutes
- 1 cup (7 ounces/200 grams) granulated sugar
- 1 cup (7.5 ounces/220 grams) packed light brown sugar
- 1 ½ tsp (7.5 mL) pure vanilla extract
- 2 cups (475 mL) sour cream
Directions:
- Prepare two 8 inch cake pans by coating them with shortening and cocoa power (or flour). Make sure the oven racks are in the middle, and preheat the oven to 350 degrees F.
- Chop chocolate (if not already done) and melt with butter in the microwave, using 20 second intervals and mixing in between. Let cool.
- Add flour, cocoa, baking soda, baking powder, and salt to a medium sized bowl. Whisk together until evenly combined.
- In the bowl of a stand mixer add the eggs, both sugars, and vanilla. Beat using the paddle attachment until fluffy, about 4-5 minutes.
- Add the chocolate mixture to the eggs/sugar, and mix on low until evenly combined.
- Add the flour mixture in 3 parts to the chocolate-egg mixture, alternating with the sour cream (2 parts). Start and end with the flour mixture, and mix until just combined. Careful not to over mix.
- Split batter evenly between the two 8 inch pans, and smooth with a small off-set spatula. Drop the pans on the counter a few times before putting them in the oven (apparently its important to get out air bubbles).
- Let bake on the center rack for 30 minutes before checking cakes (absolute minimum for checking is 20 minutes. The cakes should be done after 35-40 minutes, and a toothpick should come out clean. Let cool for about 10 minutes, then loosen them with a small knife and turn out onto a wire rack to finish cooling.
Ingredients:
- 10 large, fresh egg whites (300 g)
- 2-½ cups (500 g) sugar
- 3 cups (680 g) unsalted butter, cut into cubes and cool, but not cold
- 1 tablespoon + 1 teaspoon (20 ml) pure vanilla extract
- pinch of salt
- 1 cup peanut butter
- 3 oz white chocolate
Directions:
- With a paper towel, wipe the bowl of an electric mixer with lemon juice.
- Add egg whites and sugar, and simmer over a pot of hot water (if you’re lazy like me, you just put all of it in a pot on the stove and heat gently). Heat, whisking constantly, until 160 degrees F on a candy thermometer, or until all the sugar is melted.
- With the whisk attachment, whip the egg whites until thick and glossy, and the bowl is a neutral temperature when touched (it took a really long time for my bowl to cool, to the point where I just turned off my mixer because it was actually getting hot).
- Add cubes of butter a few at a time, beating with the paddle attachment in between additions.
- Add vanilla and salt, beating until combined (this is where I split the batch of frosting, so the next two steps are only for a half batch of this recipe).
- Take ~1 cup of the frosting and beat in the peanut butter until fluffy.
- Put the white chocolate in a heat safe bowl, and heat in the microwave for 20 seconds at a time, stirring in between. When the chocolate is all melted, add to the frosting and mix until combined (let it cool first if it is too warm).
- Add COLOURS!
Assembly:
- Cut each cake in half, horozontally. Ideally this is done with a long serrated knife, in one cutting motion (to minimize the crumbs).
- Divide the peanut butter filling into thirds. Spread the first third onto one section of the cake, and stack the next section on top of it. Repeat with the remaining two thirds of the filling. Put the cut side of the final layer down, facing the layer of filling, so that the tops of the cake is smooth.
- Put a thin layer of icing on the exterior surface of the cake (crumb coat), and chill in the refrigerator for an hour or so. Once the cake has firmed up a bit, finish frosting and decorating as you please!
