Roopa
I’ve always found gumpaste flowers exceedingly beautiful, but there is a little bit of a barrier to entry for these guys. They require a lot of parts, a LOT of time, and a decent amount of know how. Now that I’m a bit adultier than when this blog started, I don’t always have a lot of time, so I’ve been a little bit reluctant to sink 16 hours into something that might look decent in the end, and definitely won’t be edible. I was pretty excited to learn some basic gumpaste work in this class, and think I’d have a way better starting point for anything else I choose to do. It’s definitely too time consuming for me to do much of it, but I enjoyed the process and could see myself making a lily here or a rose there.

GUM PASTE
I think it’s unlikely that I will ever make this – I’d rather just buy the satin ice stuff – but here is a recipe for good measure.
INGREDIENTS
- 400 g icing sugar
- 10 g gum tex
- 35 mL water
- 35 g glucose syrup
- 2 mL glycerin
DIRECTIONS
- Combine gum tex and 2/3 of icing sugar in a large bowl.
- Warm up the water, glucose, and glycerin.
- Knead the water mixture with the sugar mixture.
- Place gum paste in a bag and let it rest overnight.
- Mix in the remaining icing sugar the next day.
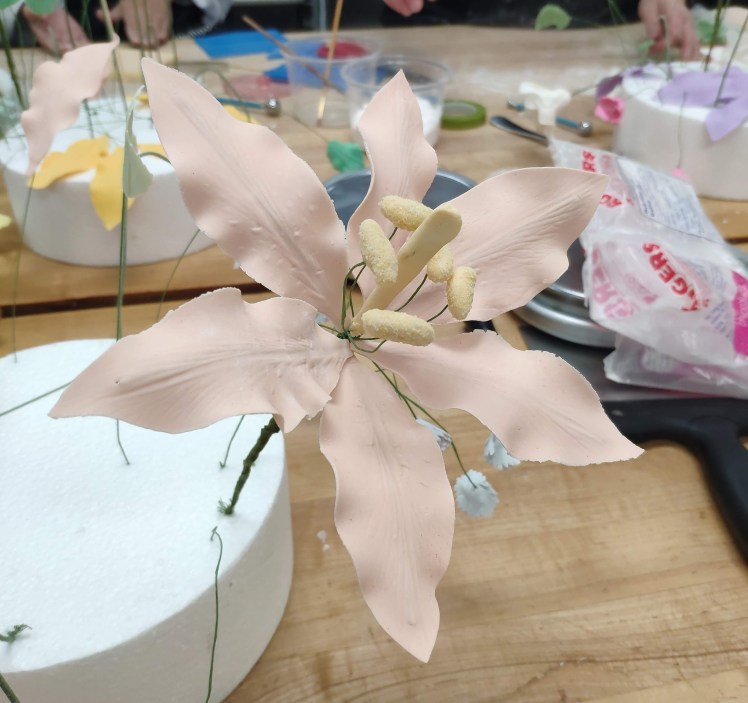
LILY
DAY 1
- Create a fish hook on a large wire
- Create the pistil of the lily on the wire
- Create 5 stamens on small wires (that have little hooks bent into them)
- Roll the stamens in cornstarch
DAY 2
- Attach the stamens to the pistil
- Cut out 6 petals per lily (and maybe an extra)
- Roll out a little “sausage” on a thin wire for each petal
- Glue the petal to the wire using egg white and press on with a silicone lily pattern
- Roll out the edges of each petal with the ball tool
- Bend the petals
- Cut out 3 leaves per lily, and follow the exact same process as for the petals
DAY 3
- Attach 3 petals to the the stamen and tape everything down
- Attach the other 3 petals in the gaps and tape everything down
- Attach the leaves and tape everything down
- Steam the lily
DAY 4
- Apply petal dust
- Assemble


ROSES
DAY 1
- Create a fish hook on a large wire
- Make a cone shape and adhere to the wire. It’s VERY important that this isn’t too big
DAY 2
- Use the small rose cutter to create a very thin cutout
- Roll the edges and the center of each petal
- Arrange it using the numbers
- After the first set of petals have dried, use the small cutter again to do another rose layer using the letters
- After rolling the edges, flip it upside down and use a toothpick to curl a point
DAY 3
- Use the medium rose cutter and follow the same process as petal layer 2
- Do this until the rose is the size you want it to be
- Use a calyx cutter to create the rose bud
- Put some cuts in it to make it realistic, and pull down the edges once you adhere it to the rose
- Steam the rose
DAY 4
- Apply petal dust
- Assemble


CARNATIONS
DAY 1
- Make the carnation base using the small cutter
- Thin out the edges using a wooden skewer
- Create the base using a small wire
- Fold in half, then in thirds
DAY 2
- Keep adding layers whenever the previous one is dry. The first 3 should be the small cutter and the next 3 should be the medium cutter. You will probably die before you add more layers than that.
DAY 3
- Add any remaining layers.
- Create a cone shape out of green and add it as a base
- Steam the carnations
DAY 4
- Really, I should have added more layers but I hate these flowers and I quit
- Apply petal dust
- Assemble


LEAVES
DAY 1/ DAY 2
- Cut out leaves whenever you have downtime
- Prepare them the same way as lily leaves/petals and on thin wires
DAY 3
- Tape each leaf wire
- Join the first three together and tape them
- Join the other two and tape them
- Steam everything
DAY 4
- Apply petal dust
- Assemble


