Roopa
It’s wedding time!
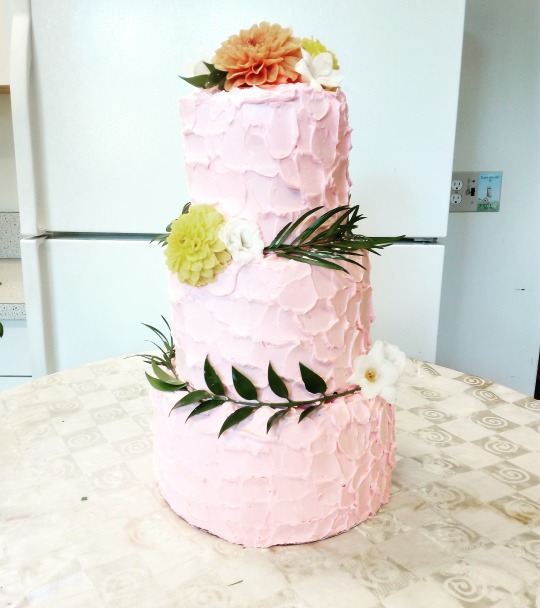
To recap, my friend Gina asked me to make her wedding cake last year, and of course I said yes. Her and Alex wanted a three tier lemon raspberry cake with a “messy” buttercream finish. I’m not all that confident with my fondant skills, so this worked for the best. I did a few prep cakes to get the cake down, and then took a few days off work to actually bake the cake.
The final cake was 3 x 6″ pans, 3 x 8″ pans, and 3 x 10″ pans. I did some math, and made three times the recipe shown below. I did the 8″ pans with the first batch, the 6″ pans + a 10″ pan with the second batch, and two 10″ pans with the third batch.
To make things efficient, I greased and lined the pans at the start. I also measured out my butter + sugar + lemon zest into three bowls at the start.

LEMON CAKE (adapted from Layered )
- 650 g cake flour
- 3 tsp. baking powder
- 1.5 tsp. baking soda
- 1 tsp. salt
- 340 g unsalted butter (room temp)
- 600 g granulated sugar
- 20 g lemon zest
- 1.5 tsp. vanilla
- 2 eggs
- 6 egg yolks
- 1 tsp. lemon extract
- 2 tbsp. lemon juice
- 485 g buttermilk
DIRECTIONS
- Preheat the oven to 350 F. Line and grease the cake pans.
- In a stand mixer (with paddle attachment) mix the butter, sugar, and zest until smooth and fluffy. It should go to a white-ish colour.
- While butter is mixing, sift together the flour, baking powder, baking soda, and salt in another bowl.
- Add the vanilla to the butter mixture. Add in the eggs one at a time. Add the lemon extract and lemon juice.
- At low speed, alternate adding the flour mixture and buttermilk to the butter mixture, starting and ending with the flour mixture.
- Using a scale, evenly divide batter between the cake pans.
- Bake until a toothpick comes out clean (>20 minutes)
- Let the cakes cook for 20 minutes and then invert onto cooling racks.
Notes:
- I did my calculations to simplify things, but they are a little off. Basically, I considered the 3 x 6″ pans to be a single batch, the 3 x 8″ pans to be a double batch, and the 3 x 10″ pans to be a triple batch. Technically, if the 3 x 6″ pans are a single batch, the 3 x 8″ pans are a 1.8x batch, and the 3 x 10″ pans are a 2.8x batch. I decided this was close enough, and just cut more off the tops.
- To make things efficient I just got batter prepared while the previous cakes were baking.
- I used a lot of lemon since the first cake I made barely had any lemon flavour.
- Each cake (after torting) ends up at about 5.5″ (14 cm) tall
- I left the butter out overnight which got it to the perfect temperature (in Vancouver summer)
I made 2.5 batches of buttercream to ice the cake. I didn’t actually need as much since I used jam inside the cake. I tried to make raspberry icing, but I couldn’t not get the flavour across. Gina didn’t want seeds in the icing, but it seems like the straining process strained away the flavour as well. I decided to bypass adding any raspberry to the icing and to just let the jam impart the flavour.
SWISS MERINGUE BUTTERCREAM (adapted from Layered )
- 240 g egg whites
- 400 g granulated sugar
- 675 unsalted butter
- 1 tbsp. vanilla
DIRECTIONS
- Put the egg whites and sugar in a stand mixer bowl and whisk together immediately.
- Put the bowl over a bain marie (making sure it doesn’t touch the water)
- Whisk the mixture until it reaches 72 C.
- Remove the bowl and place it into the stand mixer. Mix with the whisk attachment on high speed until the bowl is room temperature (8 – 10 mins).
- Switch to the paddle attachment and add in butter a few spoons at a time (at low speed). Add in vanilla once butter is added.
- Increase to medium speed and beat until the buttercream is silky looking.
Notes:
- Again, the butter being left out overnight allowed for the perfect consistency.
- If something looks wrong, it can probably be fixed. There are a ton of resources on troubleshooting SMBC woes.
- If you have to mix this out of the fridge, it may change colour. The icing I brought with me to the wedding changed colour and I couldn’t use it on the cake.

ASSEMBLY
- Once the cakes have all cooled, torte them. I used my cake leveler to do this. I suggest doing this after you’re done all of the cakes so that they can be cut to identical sizes.
- After torting, I used a pastry brush to apply a simple syrup. I just did a a 1:1 sugar:water mixture with some cut up lemons.
- Once the cake layers were prepared, I got each tier ready. I used my first batch of icing to create domes and filled the insides with jam. I also did a very thin crumb coat, and refrigerated the tiers overnight. I built each tier on its respective cake board.
- The next day, I prepared a second and third batch of icing. I tried to get the first day’s icing close to the colour I wanted, but I wasn’t super concerned since it would all be covered.
- I coloured the icing appropriately and iced each tier. Once iced, I stuck them back in the fridge.
- I picked up some food grade dowels to place in the bottom two tiers. I used a hacksaw and mitre box to cut them to size (although I was really considering buying a bandsaw). I am pretty sure I gratuitously doweled, but better to be overdoweled than underdoweled!
- I used some non slip mats to put the cake tiers in cardboard boxes for transportation, and then prayed that they didn’t move in the car.
- Once at the venue, I stacked the tiers! My icing changed colour so I just used flowers and greenery to hide things that weren’t perfect.


